Let's start assuming that you:
- Installed the latest 32-Bit version of MapWinGIS using the installer available on the MapWinGIS GitHub site;
- Created a new WinForms project in Visual Studio and have a new Form to add Map control to.
- Note
- You can create a 64-Bit version of you application and run it with the 64-Bit version of MapWinGIS, but you need to install the 32-Bit version of MapWinGIS as well to be able to use the control in Visual Studio. This is because Visual Studio cannot handle 64-Bit ActiveX controls.
A. Adding control control to .NET WinForms project.
Here are steps to start working with MapWinGIS ActiveX control:
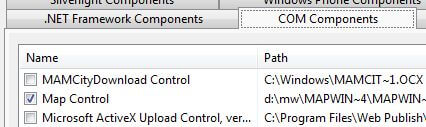
- Right click on Toolbox window (Ctrl + Alt + X) and select "Choose items" option.
- Choose "COM Components" Tab and check MapWinGIS "Map control" item in the list.
It will appear in the toolbox:
- Drag the control from Toolbox on design surface of the form.
- Set the following properties for the control in Properties window (F4):
tkTileProvider
Tile providers enumeration
Definition: Enumerations.cs:2837
tkMapProjection
Commonly used map projections to be set in Form Designer (see AxMap.Projection property).
Definition: Enumerations.cs:1741
tkKnownExtents
List of known extents (mostly countries of the world)
Definition: Known extents.cs:7
Map component for visualization of vector, raster or grid data.
Definition: AxMap.cs:56
tkTileProvider TileProvider
Gets or sets tile provider for the map.
Definition: AxMap.cs:323
tkMapProjection Projection
Sets projection of the map. It providers 2 most commonly used coordinate system/projections to be eas...
Definition: AxMap.cs:2709
tkKnownExtents KnownExtents
Gets or sets known extents for the map.
Definition: AxMap.cs:2384
- Note
- The screenshots actually show BingMaps provider, but in version 4.9.3 it requires an API key to be specified first, therefore we changed instructions to OpenStreetMap which is available out of the box.
Map control should redraw itself according to these settings.
- Run the project to make sure that it works at runtime.
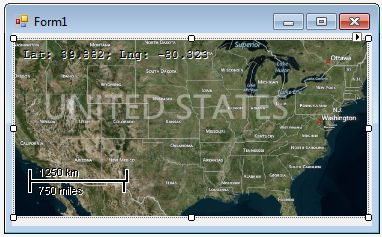
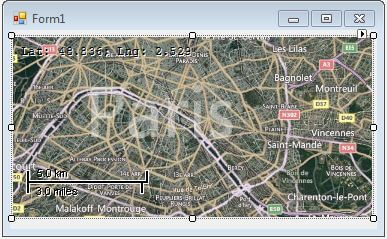
To change the area of map being displayed the following properties can be used: AxMap.Latitude, AxMap.Longitude, AxMap.CurrentZoom. For example, to display Paris, let set them to: Latitude = 48.85; Longitude = 2.36; CurrentZoom = 12.
- If you access Internet via proxy it may also be needed to configure proxy settings for MapWinGIS.
Start with calling:
axMap1.Tiles.AutoDetectProxy();
If that doesn't help, try to set it explicitly:
axMap1.Tiles.SetProxy("ip_address_of_proxy", port);
Finally if tiles are still not shown the issue can be debugged with Fiddler. To allow Fiddler intercept HTTP requests set the following proxy settings:
axMap1.Tiles.SetProxy("127.0.0.1", 8888);
- Additional information displayed on the map can be configured using:
B. Adding documentation to Visual Studio IntelliSense.
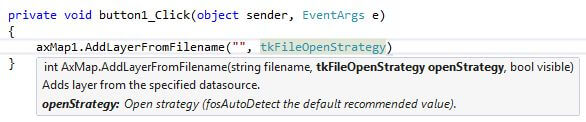
Let's add a button, double-click on it and start typing some code. We shall see VS IntelliSense autocomplete menu, however there won't be any description of members.
To fix this use the following steps:
- Open folder with MapWinGIS installation (by default c:\dev\MapWinGIS) and copy Interop.MapWinGIS.xml and AxInterop.MapWinGIS.xml files in obj\Debug folder in your project. The names of Interop assemblies which should already be there must match the names of the files: Interop.MapWinGIS.dll and AxInterop.MapWinGIS.dll.
- Reload your WinForms project to make sure the new files are found.
Let's try to type the same line once more. Description of API members must be present this time.
The latest versions of XML documentation for Interop assemblies can also be found in the repository: Interop.MapWinGIS.xml AxInterop.MapWinGIS.xml
C. Default hotkeys.
Map control uses the following built-in keyboard hotkeys:
- "+" - zoom in;
- "-" - zoom out;
- "*" - zoom to the closest tile level;
- "Home" - zoom to combined extents of all data layers (max extents);
- "Backspace" - zoom to previous extents;
- "Shift + Left", "Shift + Right" - zoom to the prev/ next layer;
- "Z" - ZoomIn tool;
- "M" - measuring tool;
- "Space" - switches to panning mode; after releasing shift the previous map cursor is restored;
- arrow keys - to move the map;
- mouse wheel - to zoom in/out regardless of the current tool.
Hot keys will work if map is focused. It's enough to click the map with mouse to set input focus to it.
Arrow keys won't be passed automatically to AxMap control. To enable them the following code should be placed in constructor of Form:
this.axMap1.PreviewKeyDown += delegate(object sender, PreviewKeyDownEventArgs e)
{
switch (e.KeyCode)
{
case Keys.Left:
case Keys.Right:
case Keys.Up:
case Keys.Down:
e.IsInputKey = true;
return;
}
};
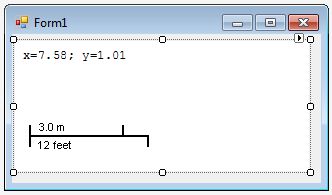
D. Measuring tool.
MapWinGIS has built-in measuring tool. To start measuring set in Properties window or in code:
@ cmMeasure
Measuring of area or distance will take place. See Measuring class for details.
Or use M hotkey when map is focused. Mouse cursor will have a ruler at its bottom. To toggle to area measuring mode use:
tkMeasuringType
Possible measuring types.
Definition: Enumerations.cs:1594
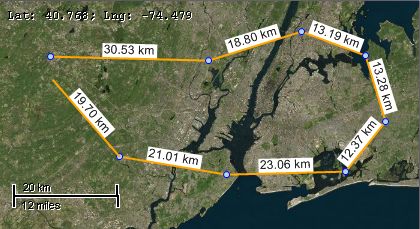
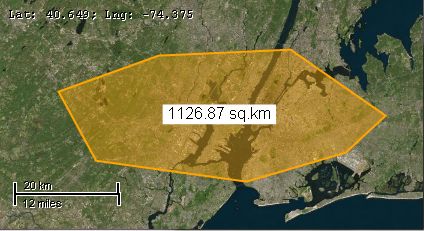
Here are screenshots for both modes of measuring:
|
|
|
| Measuring distance | Measuring area |
The following mouse hotkeys are supported:
- Left-click: add new points;
- Right-click: undo the last point;
- Double-click: finish measuring of the current path; the next left click after it will start a new path;
- Ctrl-click on one of the preceding vertices in distance mode, to close polygon and measure its area;
- Shift-click to snap to the closest vertex of shapefile.
To clear measured path set different cursor to AxMap.CursorMode property (Z shortcut can be used to switch to cmZoomIn tool).
E. Displaying data layers.
Data layers can be opened with or without explicit creation of corresponding COM object.
- Without explicit creation of COM object:
string filename = "z:\\some_filename.shp"
int layerHandle = axMap1.AddLayerFromFilename(filename,
tkFileOpenStrategy.fosAutoDetect,
true);
if (layerHandle == -1) {
Debug.WriteLine("Failed to open datasource: " + axMap1.FileManager.get_ErrorMsg(axMap1.FileManager.LastErrorCode);
}
tkFileOpenStrategy
Possible open strategies for datasources.
Definition: Enumerations.cs:1799
- With explicit creation of COM object:
For shapefiles:
if (sf.Open(filename, null)) {
int layerHandle = axMap1.AddLayer(sf, true);
}
else {
Debug.WriteLine("Failed to open shapefile: " + sf.get_ErrorMsg(sf.LastErrorCode));
}
Provides a functionality for accessing and editing ESRI shapefiles.
Definition: Shapefile.cs:72
For RGB images
if (img.Open(filename, null)) {
int layerHandle = axMap1.AddLayer(img, true);
}
else {
Debug.WriteLine("Failed to open image: " + img.get_ErrorMsg(img.LastErrorCode));
}
Represents an raster image of particular format which may be added to the map.
Definition: Image.cs:66
Opening of grid datasources with explicit creation of COM object is somewhat more involved topic. See details in overview of Grid class.
It may also be needed to call:
axMap1.ZoomToLayer(layerHandle);
F. Projection mismatch testing.
Adding of layer to the map may fail because of projection mismatch testing (GlobalSettings.AllowProjectionMismatch). It's turned off by default (i.e. set to true; mismatch is allowed), so any layer will be added to the map even if its projection doesn't match.
If projection mismatch testing is on and reprojection option is chosen (GlobalSettings.ReprojectLayersOnAdding), a copy of datasource may be created in AxMap.AddLayer. Any initialization logic in this case should be run after layer was added to the map.
new GlobalSettings() { AllowProjectionMismatch =
false, ReprojectLayersOnAdding =
true };
if (sf.Open(filename, null))
{
int layerHandle = axMap1.AddLayer(sf, true);
sf = axMap1.get_Shapefile(layerHandle);
}
tkLabelPositioning
The available positioning of the label relative to the parent shape.
Definition: Enumerations.cs:835
Holds global settings for MapWinGIS. Allows to retrieve GDAL errors.
Definition: GlobalSettings.cs:29
The previous point is relevant only if projection of datasource is different from projection of map. In most cases there is no difference whether to do initialization before or after adding it to the map. To make sure that map uses the same projection as the one set for datasource use:
axMap1.GrabProjectionFromData = true;
Built-in reprojection is currently supported for shapefile layers only.
G. Updating the previous versions of MapWinGIS.
To update your application to a new version of MapWinGIS the following steps will be needed:
1) Install the new version of MapWinGIS from installer or register it manually with regsvr32 utility (all dependent libraries must be present in the latter case);
2) Create a new WinForms project in Visual Studio, select necessary version of .NET Framework, add MapWinGIS control to the form.
3) Copy automatically created interop assemblies (Interop.MapWinGIS.dll, AxInterop.MapWinGIS.dll) from new_winforms_project\obj\debug to your_old_winforms_project\obj\debug.
4) Rebuild project. Over a course of time there were a few small changes in API (like Shape.numPoints -> Shape.NumPoints), so perhaps a couple of batch renamings will be needed.
5) It's also recommended to comment the following line in Form Designer:
this.axMap1.OcxState = ((System.Windows.Forms.AxHost.State)(resources.GetObject("axMap1.OcxState")));
This will reset control's properties set in the designer, as outdated state information often becomes a source of problems.